MAKCU Toolkit
Connect. Update. Diagnose. 接线 · 更新 · 诊断
Start with Toolkit when your MAKCU needs an update or stops working. It guides the connection, checks firmware and sends diagnostic reports to support.
Guide checked against Toolkit 1.12.2. Screenshots use the English interface and anonymous example data. Click a screenshot to enlarge it. The download version above follows the online release information.
1Connect the three ports
Use the board’s USB1 / USB2 / USB3 labels. With one PC, connect both USB1 and USB2 to that PC.
COM port · CH343
Use USB data cables. Close AIO, app.makcu.com tabs, bridges and serial tools, including tray apps. Connect only one MAKCU.
2Get your device code and upload a report
- Open Toolkit and choose Diagnostics in the sidebar. On first use, read the report notice and press Agree and continue.
- For the device scan, unplug the mouse/controller or receiver from USB3 and connect it directly to the Toolkit PC. Wait for Windows to recognise it. Tick the direct-connection box, then press Continue to scan →.
- Wait for Report … was uploaded automatically at the bottom. Send the MK-XXXX-XXXX device code in that message to support in your ticket, together with the problem and when it happens.
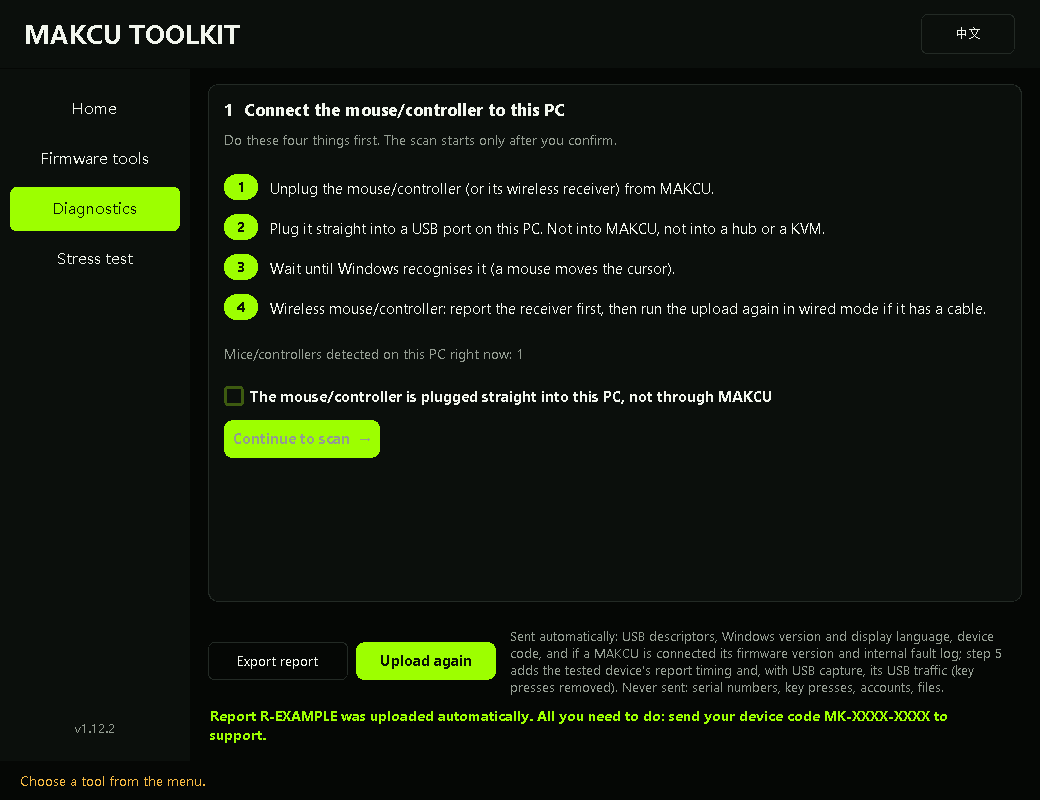
Upload failed? The result message still contains your device code. Send that code. Reports retry next launch; you can also use Upload again, or Export report and attach the exported file. Wireless device: report the receiver first; if supported, report wired mode separately.
3Normal firmware update
Use this when Toolkit can read the current MAKCU firmware. The tool chooses the target from its online catalog or a support assignment; use the version shown in the tool.
- From Home, press Check device and update →.
- Close other tools, unplug every cable and tick the confirmation. Press Check disconnection and let the 10-second check finish.
- Without holding a button, connect USB1 first, then USB2. Leave USB3 empty. Tick the connection confirmation and press Check device.
- On the device page, press Update firmware. Check current → target, then press Download and verify. Follow the wizard’s disconnect / reconnect / check steps again.
- At Ready to update, press Start update. Keep USB1 and USB2 connected and USB3 empty. Wait for Update complete and checked, then reconnect your mouse/controller to USB3 and test normal use.
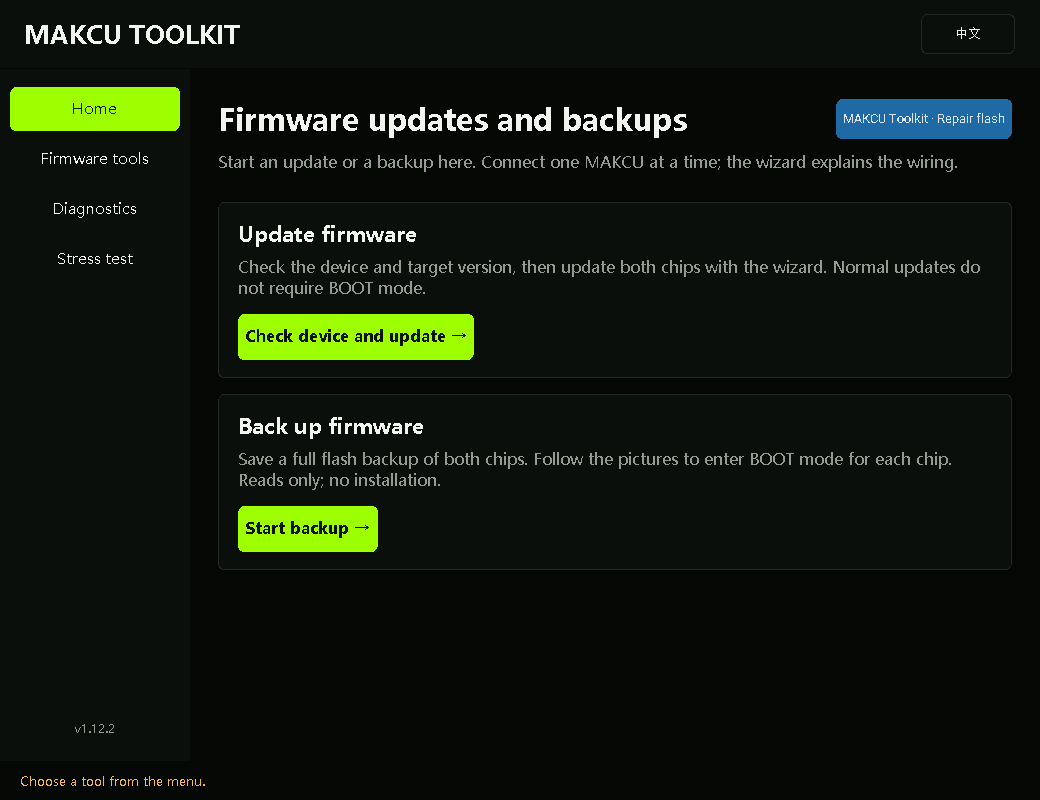
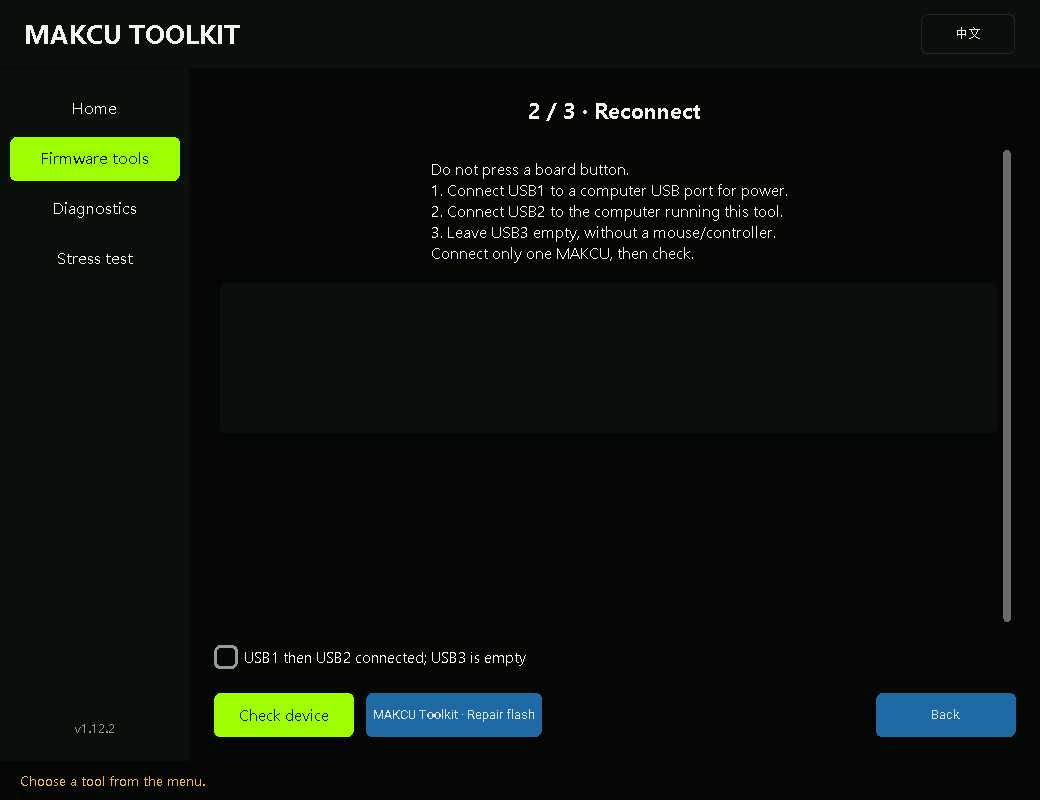
Disconnect step and optional full backup
Start backup → on Home reads both chips in BOOT mode and saves full backups. It does not install firmware. Follow its separate port pictures, keep the original .bin names and matching .json records, then return to normal connection for updating.
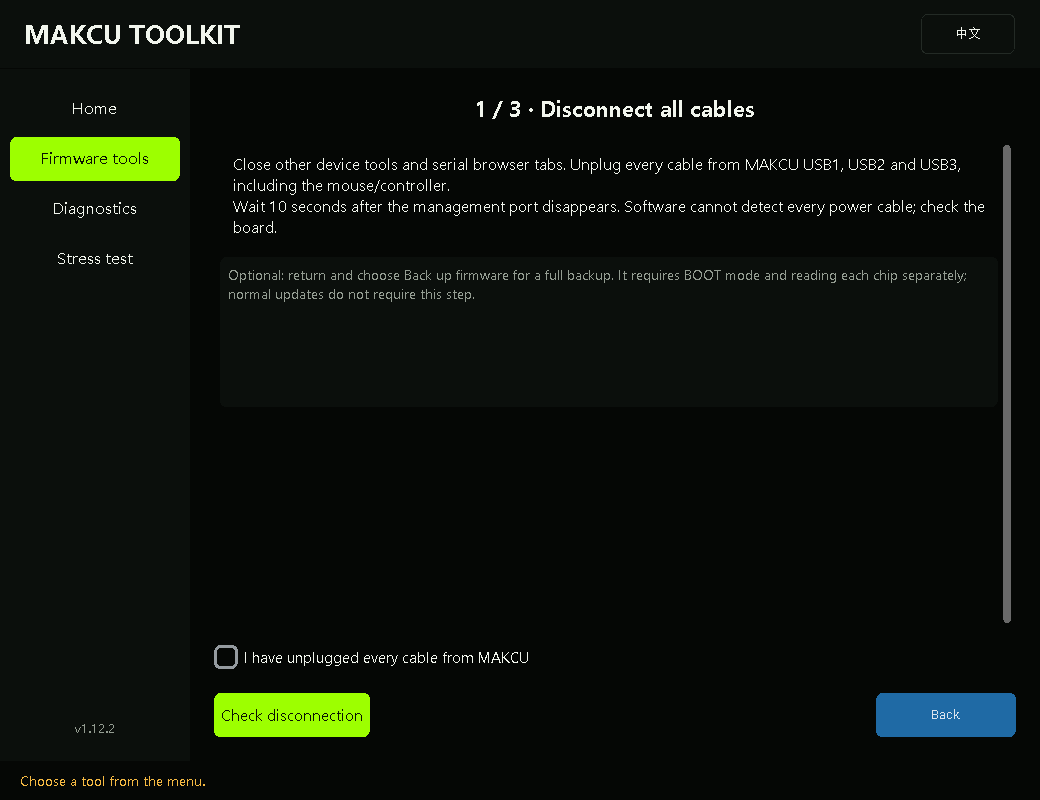
4Old / foreign firmware: Repair flash
For old V3.x, foreign firmware, or no response after reconnecting: first close other tools, unplug every cable for 10 seconds, then connect USB1 and USB2 without a button and leave USB3 empty. Use the connection check again. If normal firmware is read, use the normal update above.
- Still no response? On Home press MAKCU Toolkit · Repair flash. This entry works even when normal firmware detection fails.
- Toolkit checks for a compatible repair package. Press Repair flash → to open the wizard, then Start. Each chip is backed up before erasing; keep the backups in Documents\MAKCU backups.
- Follow the USB1 picture: unplug MAKCU, hold the small button next to USB1, connect USB1 to this PC, then release. Wait while Toolkit backs up and flashes.
- When asked, keep USB1 connected and also connect USB2 without a button. Answer the USB2 confirmation. Wait for this check; only proceed to USB3 when Toolkit asks.
- Unplug USB1 and USB2 when prompted. Hold the button next to USB3, connect USB3 to this PC, then release. Wait for its backup and flash.
- When both sides are finished, unplug all cables for 10 seconds. Reconnect USB1 and USB2 without pressing a button, leave USB3 empty and answer the confirmation. Wait for Repair finished; reconnect the mouse/controller to USB3 and check operation.
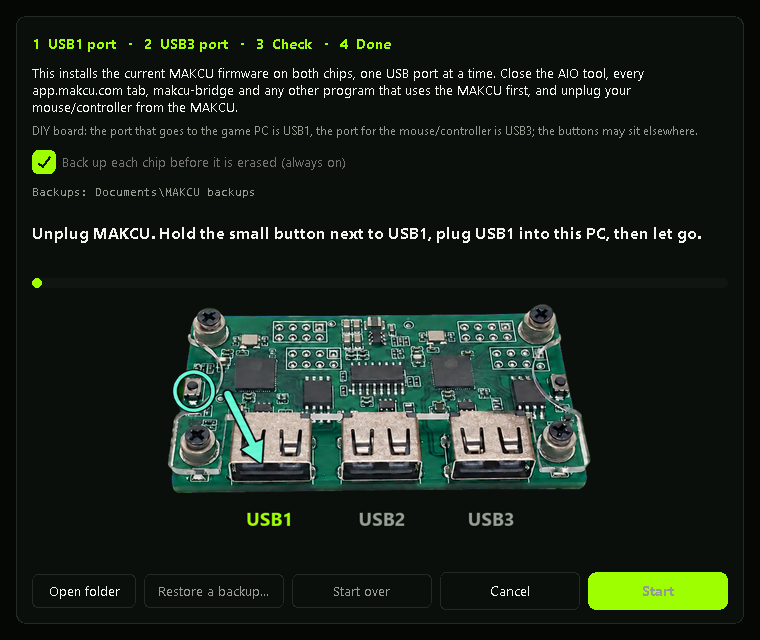
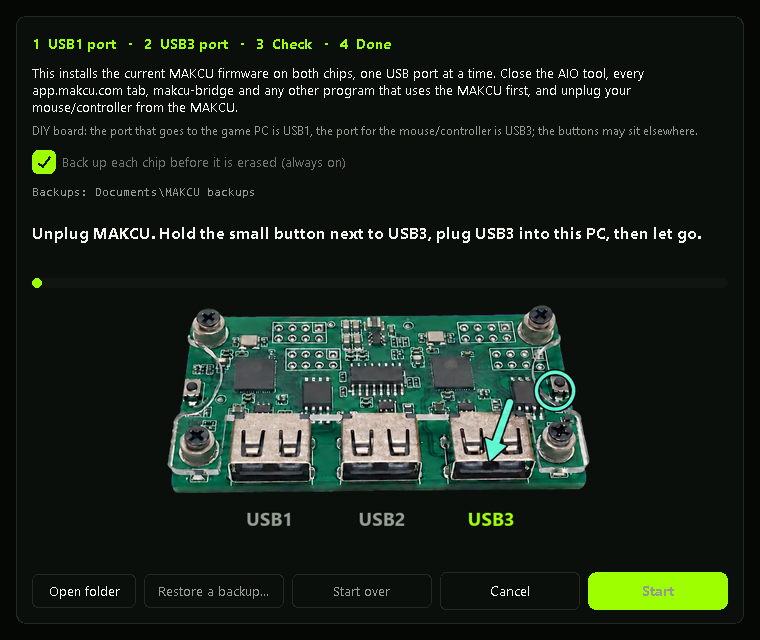
The USB1 check, and when the migration page is needed
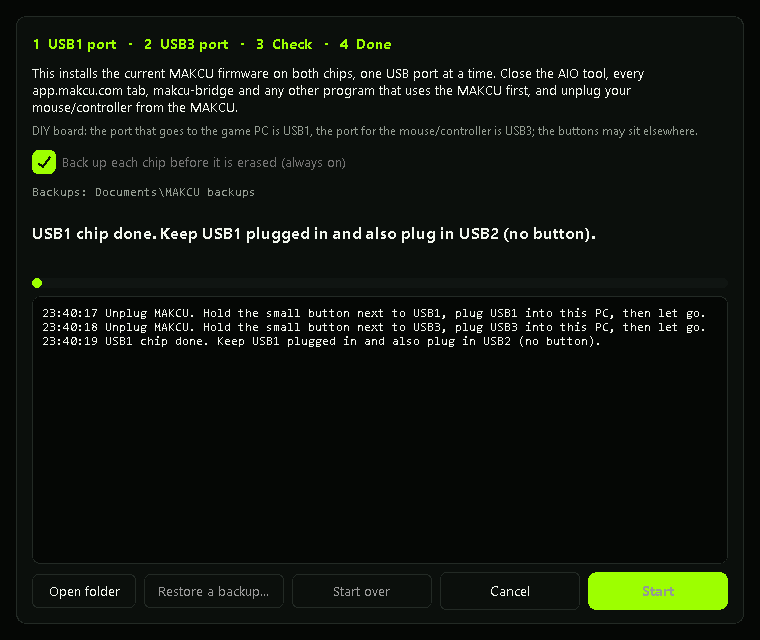
If Toolkit says its repair catalog, ROM or compatible package is unavailable, check the network and use the current Toolkit. Its Open migration page button opens the migration page. Close Toolkit and other serial tools before connecting there. Follow that page’s current instructions; send support the exact message if you cannot continue.
5Stress test and send the result
- Choose Stress test. Close other device tools, games and important documents. Keep a separate mouse to stop the test. Unplug every MAKCU cable, then press Check unplugged.
- Connect USB1 and USB2 directly to this same PC, then connect the test mouse/controller to USB3. Press Scan connected devices. Select the input through MAKCU, not your separate mouse.
- Tick the box allowing small test movements and press Start stress test. Continuously draw circles with the mouse or move the controller sticks. The first six seconds confirm physical input; no stress commands are sent yet. Keep moving through the load and recovery stages (about 40 seconds overall). Use Stop test if needed.
- Choose what you actually observed under What happened to physical movement/buttons?. Results and observations upload automatically. Send support your device code from Diagnostics, the result screenshot, and whether input recovered. Use Export test report if a file is needed.
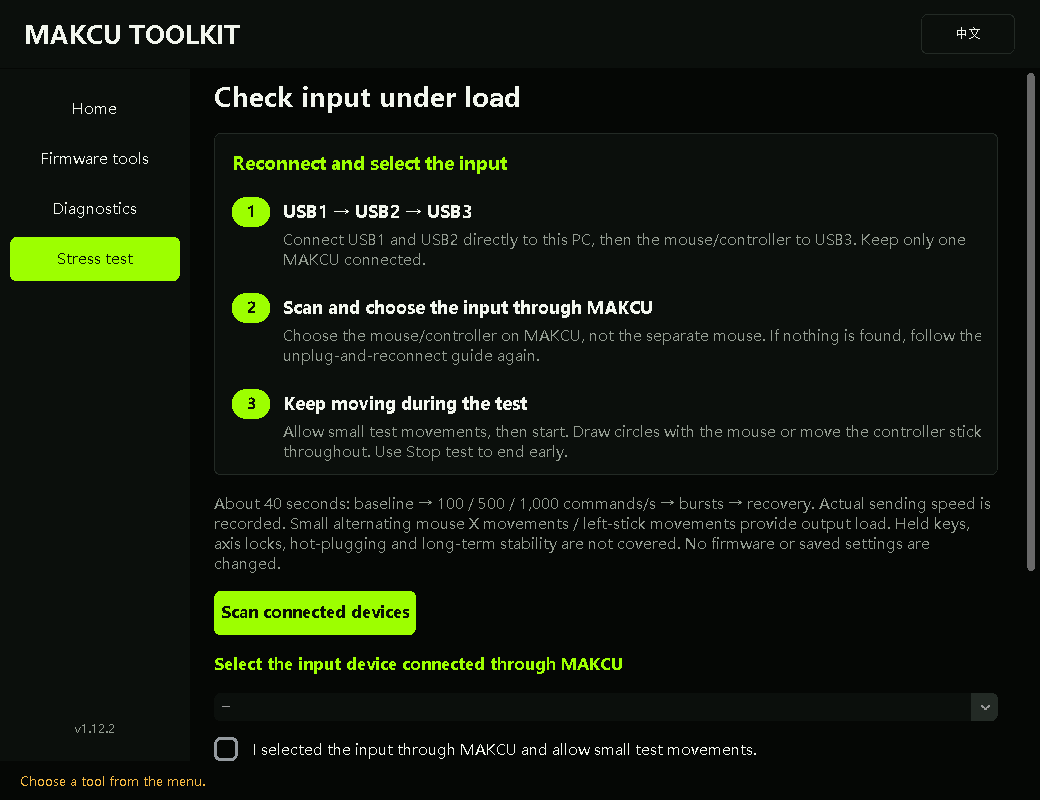
Result screen and optional USB capture
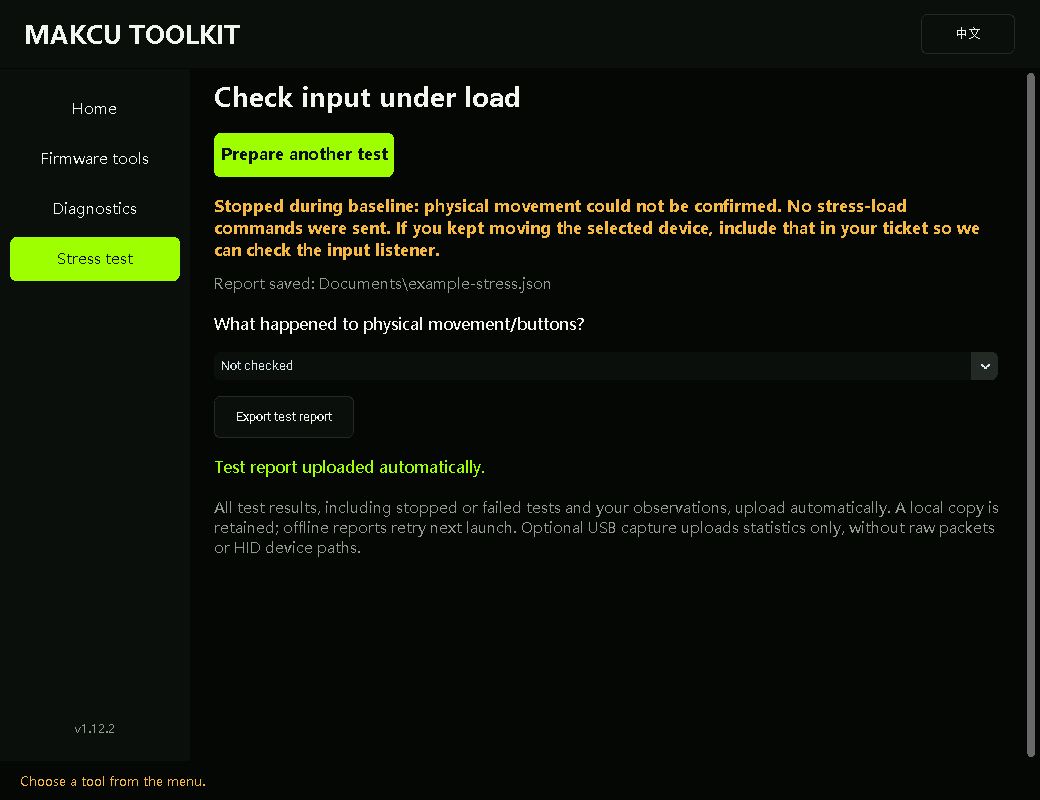
The basic test does not require USBPcap or administrator access. Leave Optional USB deep capture off unless support asks for it. This short test does not cover held keys, axis locks, hot-plugging or long-term stability.
When something goes wrong, start with Toolkit
| You see | Next step |
|---|---|
| No management port / connection check failed | Check USB2’s data cable to this PC. Close other serial apps and browser tabs; follow Toolkit’s full unplug/reconnect steps. |
| Old / foreign firmware or still no response | Use Repair flash from Home. It does not require normal firmware detection to open. |
| Update stopped | Read whether writing started. If completion is unconfirmed, keep wiring and recheck the state first. Send the exact message to support. |
| Catalog or upload unavailable | Check the network. Send your device code and message. Export the report if automatic submission is unavailable. |
| Stress test stopped or input missing | Record the stage, whether you were moving, and whether input works after stopping. Submit the report; do not infer the cause from the result alone. |
In your ticket: device code + problem / reproduction steps + exact message or result screenshot. Attach an exported report when requested. Use Toolkit first; open another flasher only when its instructions or support direct you there.
需要更新,或 MAKCU 出现故障时,先打开 Toolkit。按向导接线、检查固件,并把诊断报告发给客服。
本教程按 Toolkit 1.12.2 核对。配图统一为英文界面,设备码和报告数据为匿名示例;点击截图可放大。上方下载版本随线上发布信息更新。中文按钮名称列在英文名称旁,便于对照。
1三个 USB 口怎么接
以板上的 USB1 / USB2 / USB3 标识为准。只有一台电脑时,USB1 和 USB2 都接这台电脑。
串口 · CH343
使用 USB 数据线。关闭 AIO、app.makcu.com 标签页、桥接和串口工具(包括托盘程序)。每次只连接一台 MAKCU。
2获取设备码并上传报告
- 打开 Toolkit,点侧栏 Diagnostics(诊断与高级工具)。首次使用先阅读报告说明,点 Agree and continue(同意并继续)。
- 扫描设备时,将鼠标/手柄或接收器从 USB3 拔下,直接接到运行 Toolkit 的电脑。等 Windows 识别后,勾选“已直接接到电脑”的选项,点 Continue to scan →(确认,开始扫描)。
- 等待底部出现 Report … was uploaded automatically(报告 … 已自动上传)。将这条提示中的 MK-XXXX-XXXX 设备码发到工单,并说明故障和发生条件。
上传失败时,底部提示仍包含设备码,先把码发给客服。报告下次启动会自动补传;也可点 Upload again(重新上传),或 Export report(导出报告)后附上文件。无线设备先用接收器上报;支持有线模式时,再单独上报一次。
3正常固件更新
Toolkit 能读取现行 MAKCU 固件时用此流程。目标来自线上固件目录或客服指派,以工具实际显示的版本为准。
- 在 Home(首页)点 Check device and update →(检查设备并升级)。
- 关闭占用程序,拔掉全部线缆,勾选确认,点 Check disconnection(检查断开状态),等待 10 秒检查完成。
- 不按任何按钮,先接 USB1,再接 USB2,USB3 保持空闲。勾选接线确认,点 Check device(检查设备)。
- 设备页点 Update firmware(升级固件)。核对当前 → 目标,点 Download and verify(下载并校验),再按向导完成拔线、重连和检查。
- 显示 Ready to update(可以开始更新)后,点 Start update(开始更新)。保持 USB1、USB2 连接,USB3 空闲。等 Update complete and checked(更新完成,检查通过),再将鼠标/手柄接回 USB3,检查实际使用。
更新前的断开步骤与可选完整备份
首页的 Start backup →(开始备份)会在 BOOT 模式下分别读取两颗芯片,仅备份、不安装。按它的独立图示接线,保留 .bin 原文件名和同名 .json 记录,完成后回到正常接线再更新。
4老版/foreign firmware:修复刷写
显示 V3.x 老固件、非现行固件,或重新接线后仍无响应时:先关闭占用程序,拔掉全部线缆 10 秒,再不按键接 USB1、USB2,USB3 空闲,重新检查。若能读取现行固件,改用上面的正常更新。
- 仍无响应?在首页点 MAKCU Toolkit · Repair flash(MAKCU 工具箱 · 修复刷写)。正常固件检测未通过,也能进入这个入口。
- 工具检查兼容修复包后,点 Repair flash →(修复烧录)打开向导,再点 Start(开始)。每颗芯片擦除前都会备份,请保留 Documents\MAKCU backups 中的文件。
- 按 USB1 图示:拔下 MAKCU,按住 USB1 旁的小按钮,把 USB1 接到这台电脑,再松开。等待备份和刷写。
- 提示时,保持 USB1 插着,再不按键接入 USB2,回答 USB2 已连接的确认。等待本次检查,工具要求进入 USB3 后再继续。
- 按提示拔掉 USB1 和 USB2。按住 USB3 旁的按钮,把 USB3 接到电脑,再松开。等待该侧备份和刷写。
- 两侧完成后,拔掉全部线缆 10 秒。不按键重接 USB1、USB2,USB3 空闲,回答确认。等 Repair finished(修复完成),再将鼠标/手柄接回 USB3,检查是否正常。
USB1 刷后检查,以及何时使用迁移页
工具提示修复目录、ROM 或兼容固件包不可用时,先检查网络并使用当前 Toolkit。它的 Open migration page(打开网页迁移工具)可进入迁移页。连接前关闭 Toolkit 和其他串口工具,按该网页的当前说明操作;无法继续时,把完整提示发给客服。
5压力测试与提交结果
- 点 Stress test(压力测试)。关闭占用程序、游戏和重要文档,保留独立鼠标用于停止测试。拔掉 MAKCU 的全部线缆,再点 Check unplugged(检查已拔线)。
- USB1 和 USB2 直接接到同一台测试电脑,待测鼠标/手柄接 USB3。点 Scan connected devices(扫描已连接设备),选经过 MAKCU 的输入设备,避免选中独立鼠标。
- 勾选允许小幅测试移动,点 Start stress test(开始压力测试)。持续用鼠标画圈或移动手柄摇杆。最初 6 秒用于确认物理输入,还未发送压力命令;负载和恢复阶段也要持续操作,全程约 40 秒。需要中止时点 Stop test(停止测试)。
- 在 What happened to physical movement/buttons?(物理移动和按键实际表现如何?)中选择实际现象。结果和补充现象会自动上传。将诊断页的设备码、结果截图、停止后输入是否恢复发给客服;需要文件时点 Export test report(导出测试报告)。
结果截图与可选 USB 采集
基础测试不需要 USBPcap 或管理员权限。客服未要求时,不勾选 Optional USB deep capture(可选 USB 深度采集)。这个短测试不覆盖按住按键、锁轴、热插拔或长期稳定性。
故障时,先用 Toolkit
| 遇到的问题 | 下一步 |
|---|---|
| 未检测到管理口/连接检查失败 | 检查 USB2 是否用数据线接到这台电脑。关闭串口程序和浏览器标签页,按 Toolkit 的完整拔线、重连流程操作。 |
| 老版/foreign firmware,或仍无响应 | 用首页的修复刷写入口。打开此入口无需通过正常固件检测。 |
| 更新停止 | 先看提示是否已经开始写入。完成状态未确认时,保持接线并重新检查状态,把完整提示发给客服。 |
| 目录或上传不可用 | 检查网络,把设备码和提示发给客服。自动提交不可用时导出报告。 |
| 压力测试停止/输入丢失 | 记录阶段、是否持续移动、停止后是否恢复,提交报告,不凭结果直接判断根因。 |
工单中提供:设备码 + 故障/复现步骤 + 完整提示或结果截图;客服需要文件时附上导出报告。优先使用 Toolkit,只有工具提示或客服要求时才改用其他刷写工具。